Translate!!

Subscribe in a reader

Monday, November 16, 2009

Design a Vintage Radio Icon in Photoshop

Buzz It
submit to reddit StumbleUpon

Design a Vintage Radio Icon in Photoshop


Design a Vintage Radio Icon in PhotoshopIn this Photoshop Tutorial, you’ll learn how to design an old vintage radio using simple shapes, gradients, patterns and textures.

Materials Needed:

Step 1

Image Description
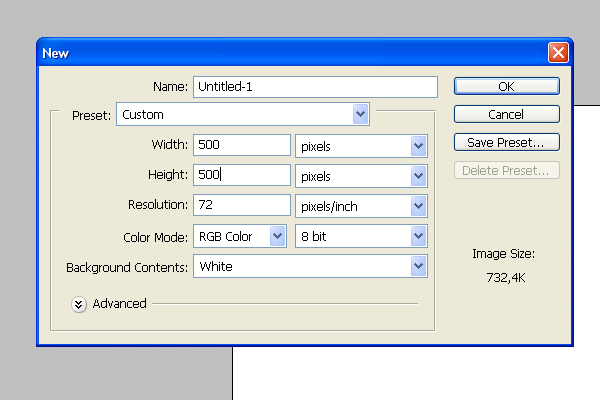
Start by creating a new document (Ctrl+N) 700×700 in dimension.

Step 2

Image Description
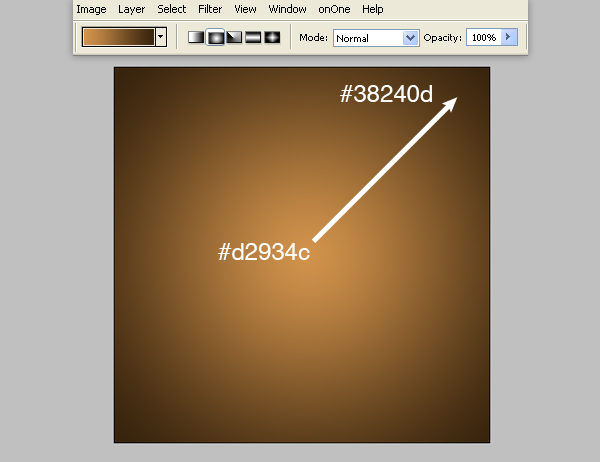
Make a radial gradient backround from center to any corner, using colors #d2934c and #38240d.

Step 3

Image Description
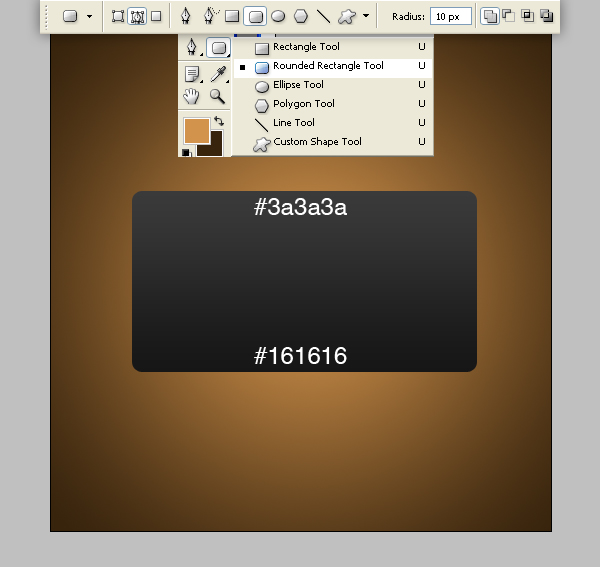
Create a new layer (Ctrl+Shift+N). Using the Rounded Rectangle Tool (U) with 10px radius, draw a rectangle. Then go to layer’s Blending options and use gradient overlay from #161616 to #3a3a3a.

Step 4

Image Description
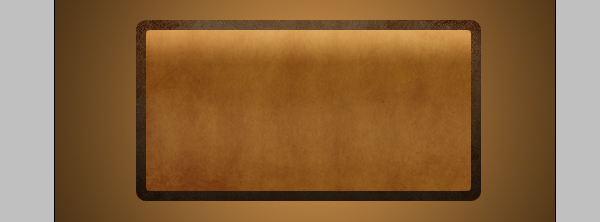
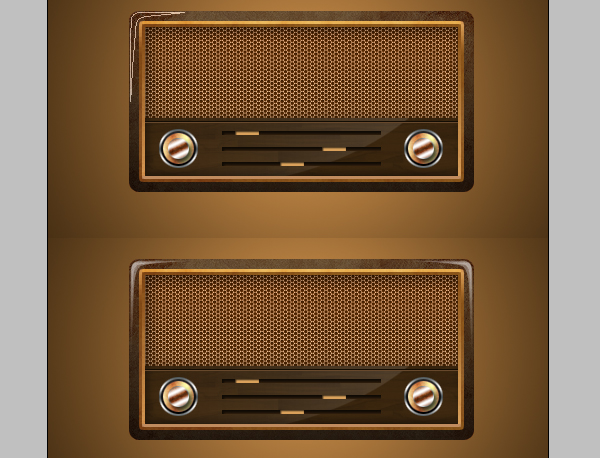
Now let’s use our paper texture. Copy it above all the other layers. Be sure it covers the rectangle. Then Ctrl+click the rectangle layer’s thumbnail. Then inverse the selection (Ctrl+Shift+I) and press delete. Change blending mode to overlay. You should have something like this now.

Step 5

Image Description
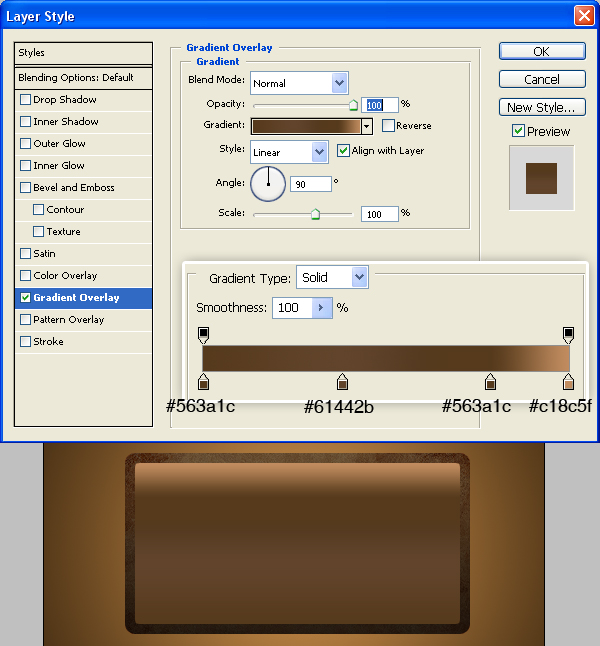
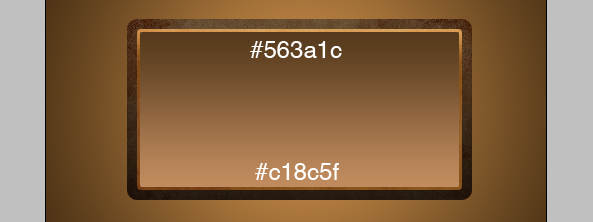
Create a new layer. Again use the Rounded Rectangle tool but this time make a smaller rectangle with 5px radius. In layer’s blending options use the linear gradient overlay with these colors: #563a1c; #61442b; #563a1c; #c18c5f.

Step 6

Image Description
Repeat Step 4 but this time Ctrl+click the previous made 5px rectangle’s thumbnail and set the paper texture’s blending mode to Soft Light.

Step 7

Image Description
Create a new layer. Take the Rectangular Marquee Tool (M) and draw a few pixels smaller rectangle than the previous one. Use gradient from #c18c5f to #563a1c.

Step 8

Image Description
Repeat Step 4 – Ctrl+click the previous made rectangle’s thumbnail and set the paper texture’s blending mode to Soft Light.

Step 9

Image Description
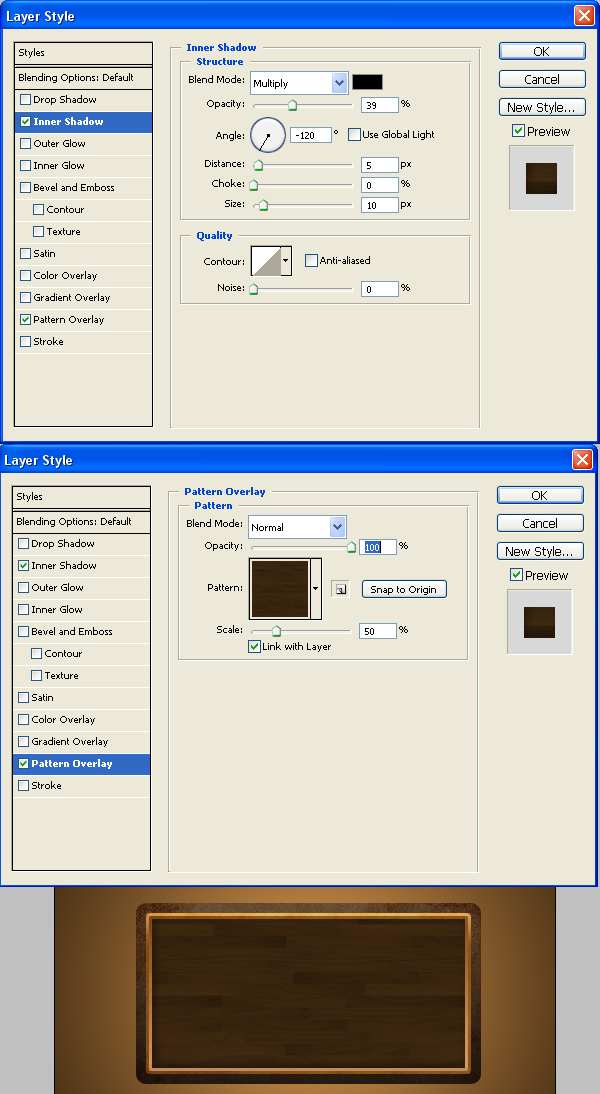
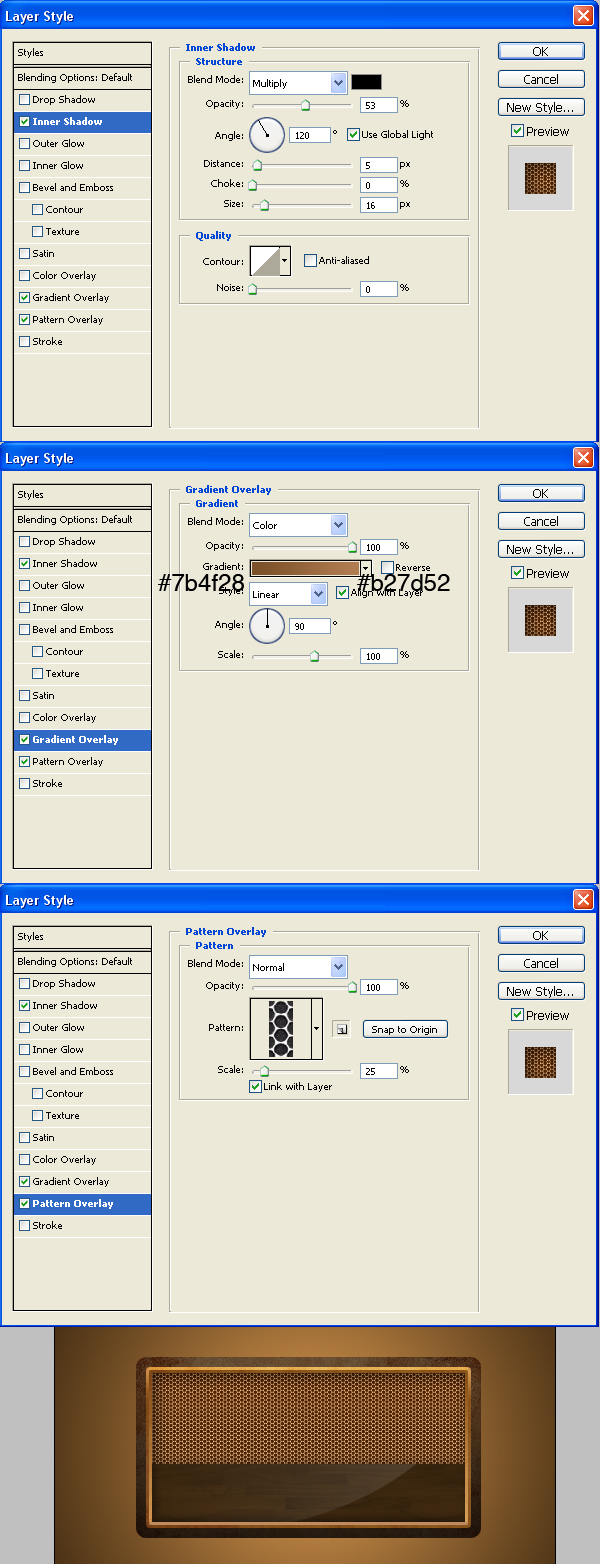
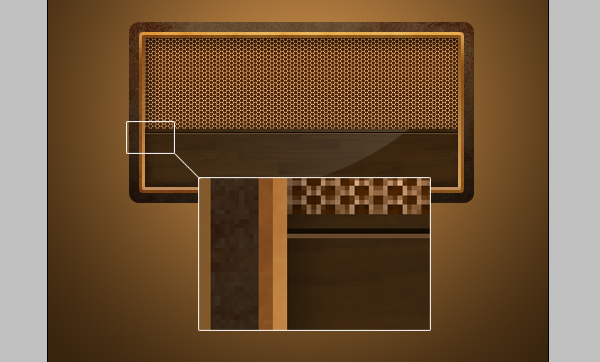
Create a new layer. Draw a few pixels smaller rectangle than the previous one. Go to it’s blending options and set an inner shadow and the wooden pattern as shown in the picture.

Step 10

Image Description
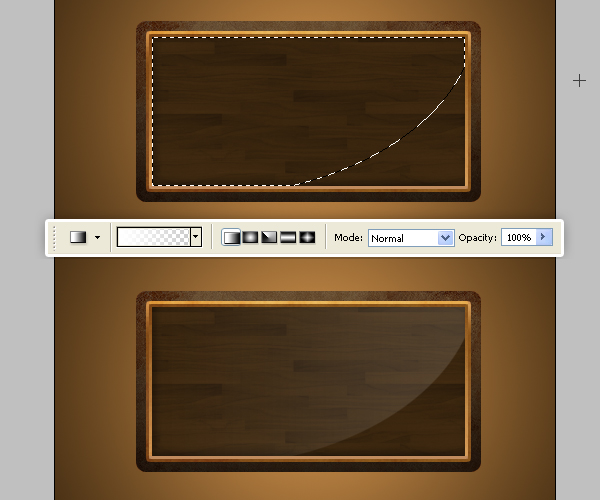
Let’s make the wooden panel shine a little bit. Create a new layer. Ctrl+click the rectangle layer we created before (so that you select the entire rectangle we will be adding the highlight to). Then take the Elliptical Marquee tool and while holding Shift+Alt, drag it over to make a selection like in the picture. Then use a white to transparent gradient from right to left and change the opacity to 13%.

Step 11

Image Description
Create a new layer. Draw a smaller rectangle and change the blending options as in the picture. Use the pattern from source files. Use colors #7b4f28 and #b27d52 for the gradient.

Step 12

Image Description
Create a new layer. Using pencil tool, draw two 1px lines using #120c04 for the dark one and #67482c for the light one.

Step 13

Image Description
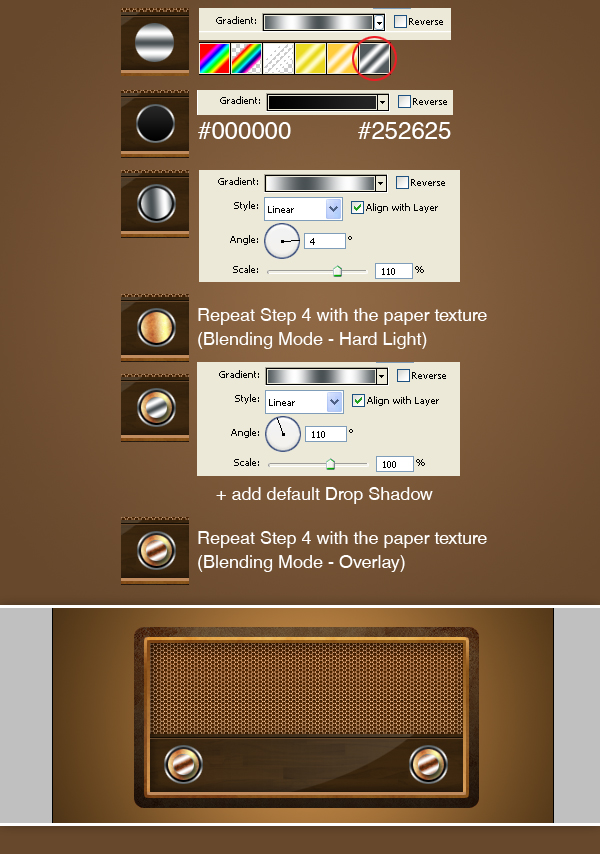
Now let’s make the radio knobs. It’s basically gonna be just a bunch of circles with different gradients and blending options. For each of the circle create a new layer. Then group all these layers (select the layers and press Ctrl+G) and duplicate the group. Place them as in picture.

Step 14

Image Description
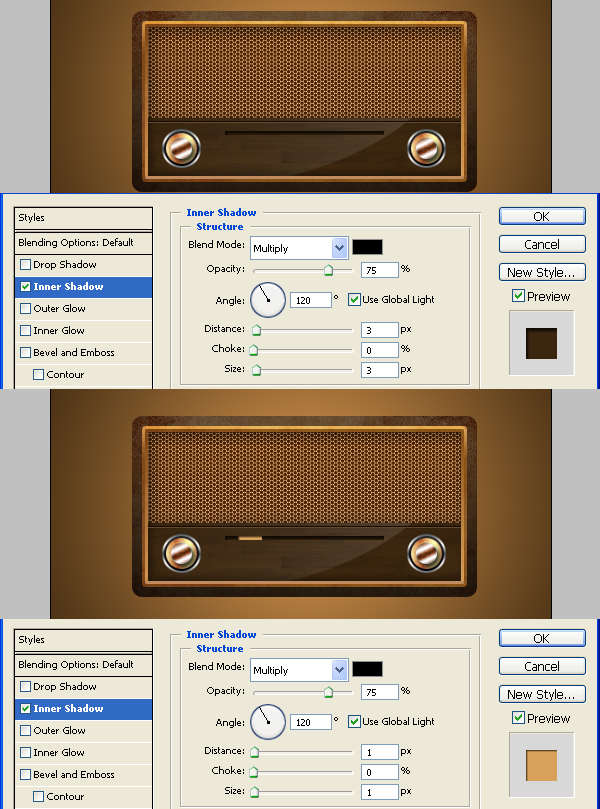
Now we’ll add a few more details. Create a new layer. Draw a thin rectangle, fill it with #3b260f and above it in a new layer a smaller one, fill it with #d9a15b. Add inner shadow to both of them.

Step 15

Image Description
Duplicate the previous 2 layers 2 times and slightly change the position of the smaller rectangle.

Step 16

Image Description
Let’s make the radio shine a little bit. Create a new layer. Using the pen tool, draw a shape like in the picture. Then left click-make selection and fill it with white. Change the opacity to 35%. Duplicate this layer and make it 2 times smaller (Press Ctrl+T and scale it down). Then duplicate both of these layers and put them on the other side of the radio.

Step 17

Image Description
Let’s add a base for the radio. Create a new layer. Using 10px rounded rectangle tool, draw a rectangle, fill it with #1e1209 and place below all the other layers.

Step 18

Image Description
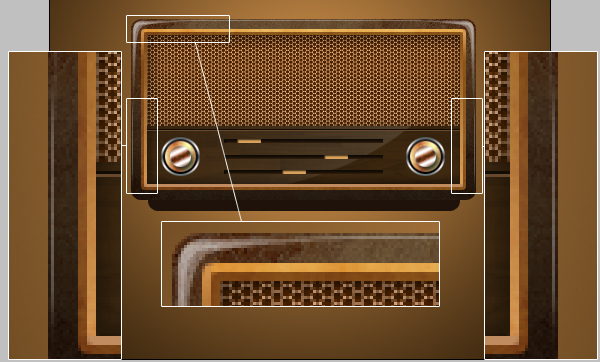
Next let’s add some pixel-perfect details. Take the pencil tool and draw 1px white lines around the radio. Use a large, soft eraser to erase the ends of the lines. Change the opacity to 27%

Step 19

Image Description
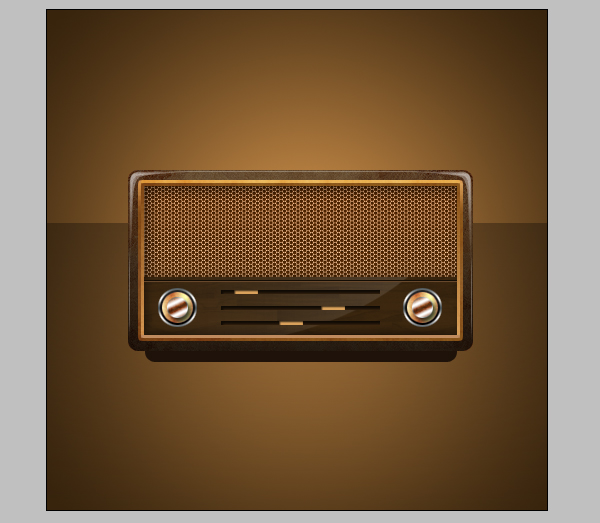
Let’s make the background more interesting. Create a new layer above background layer and with the Rectangular Marquee Tool select a bit more than half of the whole image and fill it with gradient from black to transparent. Lower the opacity to 31%.

Final Result

Image Description
Now to finish the thing, let’s make a nice reflection. Merge all of the radio layers, except background. Press Ctrl+A then Copy (Ctrl+C). Press Alt+Ctrl+Z till all the radio layers come back and then paste (Ctrl+V). Flip the layer vertically and Using a round soft brush, erase it’s bottom. Lower the opacity to 20%.
continue reading "Design a Vintage Radio Icon in Photoshop"

Using Hyperfocal Distance to Ensure Maximum Depth of Field in Landscape Photography

Buzz It
submit to reddit StumbleUpon
Using Hyperfocal Distance to Ensure Maximum Depth of Field in Landscape Photography

Have you ever got home after what you thought was a great day’s photography, only to upload your images and find that they were sharp in either the foreground or background but with the rest of the image not quite in focus?
By applying the simple rules of Hyperfocal Distance you can be sure that you are shooting images which are sharp from foreground to background on almost every occasion. I will be using an image that I took recently of Castlerigg Stone Circle to show you how you can put these simple rules into practice so that you can obtain maximum depth of field (DOF) in all your landscape images.


I am Martin Lawrence a landscape photographer specialising in images of the English Lake District and Scotland. I sell my work both on-line and in several galleries throughout the United Kingdom and hold regular exhibitions of my work. I also run One-to-One Digital Landscape Photography Courses based around the Lake District for photographers of all levels.

Final Image Preview

Before we begin the tutorial, let’s take a look at the final image.

Introduction

The hyperfocal distance is the point at which you should focus your lens to allow you to get maximum DOF. Once you’ve focused on this point, everything from half the hyperfocal distance to infinity will be sharp. This means that if you're focused at a hyperfocal distance of 10 metres then, five metres to infinity will be sharp.If you simply focus on the subject itself, then only one-third of the area in front of that subject and two-thirds of the area behind it will be sharp.
A simple cheat that will work most of the time, is to focus one third of the way into the scene. Whilst this works up to a point, to obtain maximum depth of field, you will need to calculate the hyperfocal distance correctly!

Step 1

I took the above image at Castlerigg Stone Circle near Keswick which is in the northern part of the English Lake District. The stone circle, which is owned by the National Trust but is free to visit, lies on the top of a low hill with great views across to the fells in all directions. It is approximately 30 metres in diameter with the tallest stone being 2.3 metres high. There is plenty of interest in the foreground, middle ground and background making it a perfect place to illustrate hyperfocal distance rules. If you get your calculations correct, the stones in the foreground at the front of the circle, the stones in the middle distance at the back of the circle and the fells in the distance should all be sharp and in focus.

Step 2

I took the shot using my Canon EOD 5D full-frame digital SLR fitted with a Canon ‘L’ series 24-105mm zoom lens. I used a Lee 0.3 ND grad filter to correctly expose by one stop the lighter background with the darker foreground containing the stones. The use of ND grads to obtaining correct exposure is a subject worthy of a tutorial in its own right and too complex to discuss here in any depth.
My camera was placed on a Manfrotto 055 PROB tripod with an 804RCT 3 pan-tilt head which gives me excellent stability on uneven terrain and in the gale force winds that summer in the Lake District can often bring! I use this in conjunction with a Canon RS80 remote switch to obtain the crisp images essential for printing and publishing. It’s no use carefully composing your image and going to the trouble of calculating the hyperfocal distance correctly if the camera then moves when you press the shutter!
NOTE: Before you start to shoot, you will need to go into your camera’s menu system and make sure that you are able to change individual focusing points. (See your user manual if you need hep on how to do this).

Step 3

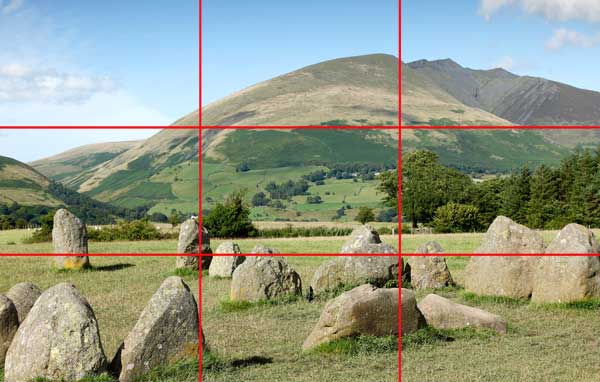
Firstly, I needed to compose the shot. I always try to do this using the rule of thirds so that I will end up with a well-balanced image. The idea here is to divide your camera’s viewfinder into a jigsaw puzzle containing nine even pieces – three across and three down. The focal point of your scene should then be placed along any of the four intersection points. It’s also good to place the horizon or any other strong feature along one of the horizontal lines; either one third from the top or one third from the bottom of the scene.
The image below that I took of Scale Force illustrates this composition rule perfectly and I have superimposed a grid over it to make it more obvious. The waterfall flows down along the left vertical grid line and there are strong focal points on three out of the four intersections. Whilst there is no real horizon here, the waterfall is contained in the top two-thirds of the image.
But remember rules can be broken sometimes as you can see from one of my best selling images – Morning Mist on Buttermere. In this image the tree silhouette has been placed directly in the middle of the scene which is what gives it impact.
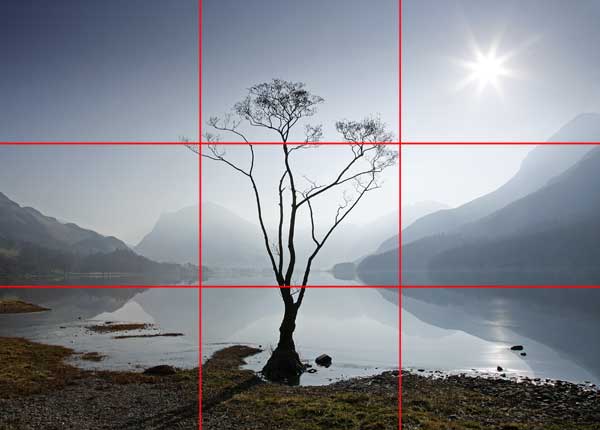
If you apply this to my finished image, you will see that I have ensured that significant stones fare placed on or close to the two lower intersection points giving the image balance. As there is no real horizon here, I have placed the field edge close to the lower horizontal line and the line of bracken on the fells perfectly on the upper horizontal line. Also, the stones fit nicely into the bottom three pieces of the jigsaw puzzle, the fells into the middle three pieces and the cloud formations into the top three pieces. The image shows strong elements in all nine pieces with the stones forming a perfect ‘lead-in line’ to the image. As you always read a book from left to right so a human eye views an image from bottom left to top right, so it is important for an image to grab the eye where it instinctively first looks for something. For this reason, I have placed one of the large stones, in the bottom leftmost piece. I have only just touched on composition here, as this is a big subject worthy of a tutorial in its own right and too complex to discuss here in any more depth.
Step 4

So let’s imagine for a moment that I knew nothing about hyperfocal distance rules. I would set my camera to aperture priority (AV on most digital SLRs) and to f22 thinking that this f-stop would give me maximum depth of field. Because I would be using a tripod and shutter release, the shutter speed would not really be that relevant as there would be very little chance of camera shake. But I would choose a low ISO (160) to try to ensure that I got a good crisp image. With my chosen lens, I would set the focal length to 24mm to obtain the widest angle shot that I could to get in most of the stones in the circle. Because the stones are the main subject of the scene, I would focus on the stones in the foreground. The resulting image would appear sharp but diffraction would occur. This is caused when light passes sharp edges or goes through narrow slits deflecting the rays of light to produce fringes of light and dark bands which distort the image. Whilst this will not be noticeable on your LCD and you may think that it looks just fine, it will be more noticeable when the image is viewed at a larger size or printed.
The following images show the results that I would get using the same ISO and focal length but changing my f-stop to f11, which is the optimum f-stop to get maximum depth of field for landscape photography, but focusing on various parts of the scene.

Step 5

In this image, I focused on the fells in the background. As you can see, the stones in the foreground are out of focus whilst the fells and a third of the distance from the fells backwards towards the camera are sharp and in focus.

Step 6

In this image, I focused on the stones in the middle ground. Here the stones nearest to the camera are slightly out of focus, the stones in the middle ground and the fells in the background are sharp and in focus.

Step 7

I will now let you into the simple secret which will correct all the above focusing problems and allow you to obtain the maximum depth of field in your landscape images. Let’s start with the formula for calculating hyperfocal distance. Don’t worry about it; it’s much less complicated than it looks!

Focal length - This will, of course, be different for every image that you take. For my shot of Castlerigg Stone Circle I used my 24 to 105mm lens at its widest focal length i.e. 24mm. This value can be read off from the top of your lens barrel once you are happy with your composition. For fixed length lenses just use the fixed focal length of your prime lens.
Circle of confusion – All you need to know here is that this constant differs depending on the type of camera that you are using and is based on what is considered to be acceptable sharpness in an 8” x10” print seen at normal viewing distance. The most popular values are as follows:-
Digital SLR = 0.02
35mm format and digital SLR full-frame = 0.03
6x6cm format = 0.06
4x5in format = 0.15
F-stop - The optimum f-number for landscape photography is considered to be either f11 or f13. My preferred f-stop is f11 as I find that this gives you the maximum depth of field without any diffraction occurring.

Step 8

Using the above formula, the hyperfocal distance for my shot was calculated as follows:-

Therefore, the hyperfocal distance is approximately 1.8 metres.

Step 9

Once you have calculated this figure, you now know the distance from your tripod that you need to focus on to obtain maximum depth of field. Without re-composing your photograph, you now need to identify an object which is that distance away from your tripod and set the focusing point on your camera on this object. Your camera will have a number of focusing points displayed on its LCD and you need to make active the focusing point that is covering this object. Again, you need to consult your camera’s manual if you are unsure how to make this focusing point active. Everything from this focusing point (i.e. the hyperfocal distance) to infinity and half way between this focusing point and the tripod will now be sharp and in focus. If you are unable to make a focusing point active on an object then switch your lens to manual focus and focus on the object manually.

Step 10

In this image, I focused on the hyperfocal distance point of 1.8 metres which I estimated to be on the two stones in the left foreground. As you can see, the result is an image which is crisp and sharp from front to back. Also, half the distance between the hyperfocal point and the tripod (approx 0.9 of a metre) would also be pin sharp.

Conclusion

OK, so calculating the hyperfocal distance is a bit more effort and you may need to carry a calculator around when you first start to use this technique. But providing that you stick to either f11 or f13 for your landscapes, you will soon remember the different hyperfocal distances for the lenses and focal lengths that you normally shoot at. To help you, I have set out two tables below which show the hyperfocal distances at various focal lengths for the most commonly used cameras. All you need to know is the focal length multiplier i.e. crop factor of your camera and choose the appropriate table. Your manual will help you here. Cut out the appropriate table, laminate it and put it into your gear bag. Believe me; you will be truly amazed at the results that you will you get from making such a small effort.

Table 1 – Hyperfocal Distance Calculator for Digital SLR Cameras with a Focal Length Multiplier of 1.6

Table 2 - Hyperfocal Distance Calculator for 35mm and Full Frame Digital SLR Cameras with no Focal Length Multiplier

continue reading "Using Hyperfocal Distance to Ensure Maximum Depth of Field in Landscape Photography"

Create a Christmas design using Photoshop

Buzz It
submit to reddit StumbleUpon

Create a Christmas design using Photoshop

via  

In this tutorial, you’ll go through easy steps and techniques to design beautiful Christmas wallpaper or even an e-card to send to your friends.

Final Image Preview

Design beautiful Christmas wallpaper or even an e-card in Adobe Photoshop CS4
Start working by creating a new file (File>New) of 1920×1200px/72 ppi with white background contents. Select now the Rectangle Tool (U) to represent the background of the wallpaper to be.
Design beautiful Christmas wallpaper or even an e-card in Adobe Photoshop CS4
Go to Layer Style by clicking on the layer we work on the Layers’ panel to add Gradient Overlay
Design beautiful Christmas wallpaper or even an e-card in Adobe Photoshop CS4
Gradient Editor settings:
Design beautiful Christmas wallpaper or even an e-card in Adobe Photoshop CS4
We’ve got the next background:
Design beautiful Christmas wallpaper or even an e-card in Adobe Photoshop CS4
Make a copy of the last made layer and apply on the copy’s layer different parameters for Layer Style > Gradient Overlay:
Design beautiful Christmas wallpaper or even an e-card in Adobe Photoshop CS4
Gradient Editor settings:
Design beautiful Christmas wallpaper or even an e-card in Adobe Photoshop CS4
Also set the Fill for this layer to 0%.
Design beautiful Christmas wallpaper or even an e-card in Adobe Photoshop CS4
Using the Ellipse Tool (U), try to draw a kind of snow hillock on the picture.
Design beautiful Christmas wallpaper or even an e-card in Adobe Photoshop CS4
Go to Layer Style to add Inner Glow
Design beautiful Christmas wallpaper or even an e-card in Adobe Photoshop CS4
Also set to Gradient Overlay
Design beautiful Christmas wallpaper or even an e-card in Adobe Photoshop CS4
Gradient Editor settings:
Design beautiful Christmas wallpaper or even an e-card in Adobe Photoshop CS4
Using the Pen Tool (P) try to represent now a wavy road.
Design beautiful Christmas wallpaper or even an e-card in Adobe Photoshop CS4
Next select the Layer Style. Make a double click on the left mouse’s button on this layer on the Layers’ panel and set the Inner Shadow as shown:
Design beautiful Christmas wallpaper or even an e-card in Adobe Photoshop CS4
Add Inner Glow
Design beautiful Christmas wallpaper or even an e-card in Adobe Photoshop CS4
Also set the Gradient Overlay
Design beautiful Christmas wallpaper or even an e-card in Adobe Photoshop CS4
Gradient Editor settings:
Design beautiful Christmas wallpaper or even an e-card in Adobe Photoshop CS4
Next we’ll start representing a fir-tree using the Pen Tool (P). Start with the primary layer.
Design beautiful Christmas wallpaper or even an e-card in Adobe Photoshop CS4
Go to Layer Style and set the Inner Shadow as shown:
Design beautiful Christmas wallpaper or even an e-card in Adobe Photoshop CS4
Add the Gradient Overlay
Design beautiful Christmas wallpaper or even an e-card in Adobe Photoshop CS4
Gradient Editor settings:
Design beautiful Christmas wallpaper or even an e-card in Adobe Photoshop CS4
Make a copy of the last made layer, set Fill to 0% and go to Layer Style to remove the Inner Shadow but add the Outer Glow as shown:
Design beautiful Christmas wallpaper or even an e-card in Adobe Photoshop CS4
Set the Gradient Overlay
Design beautiful Christmas wallpaper or even an e-card in Adobe Photoshop CS4
Gradient Editor settings:
Design beautiful Christmas wallpaper or even an e-card in Adobe Photoshop CS4
Add Stroke
Design beautiful Christmas wallpaper or even an e-card in Adobe Photoshop CS4
Next we’ll represent the branches’ inclination, using the same Pen Tool (P). Place this layer under the previous made one on the Layers’ panel.
Design beautiful Christmas wallpaper or even an e-card in Adobe Photoshop CS4
Set Fill to 0% and go to Layer Style > Drop Shadow
Design beautiful Christmas wallpaper or even an e-card in Adobe Photoshop CS4
Using the same tools, try to make the inclination of the branches on the other side.
Design beautiful Christmas wallpaper or even an e-card in Adobe Photoshop CS4
Set Fill to 0%, add Layer Style > Drop Shadow
Design beautiful Christmas wallpaper or even an e-card in Adobe Photoshop CS4
Next we shall insert on the top of the tree a small star, using the Custom Shape Tool (U) and the color #FFC62C
Design beautiful Christmas wallpaper or even an e-card in Adobe Photoshop CS4
Using the Convert Point Tool, select the anchor points of the star. Then apply the Free Transform (T) click on Maintain Aspect Ratio and drag the anchor points to the central part of the star to change the shape form.
Design beautiful Christmas wallpaper or even an e-card in Adobe Photoshop CS4
Add Layer Style > Outer Glow:
Design beautiful Christmas wallpaper or even an e-card in Adobe Photoshop CS4
Set the Stroke:
Design beautiful Christmas wallpaper or even an e-card in Adobe Photoshop CS4
Gradient Editor settings:
Design beautiful Christmas wallpaper or even an e-card in Adobe Photoshop CS4
Now we’ll represent a highlight on the star. In this case we have to make a copy of the star’s layer. Press Alt button and using the Ellipse Tool (U), we can draw a small ellipse which will cut out the unnecessary highlight’s elements. The ellipse will be turned around with the Free Transform option.
Design beautiful Christmas wallpaper or even an e-card in Adobe Photoshop CS4
Set Fill to 0% for this layer and go to Layer Style. Make a double click on the left mouse’s button on this layer on the Layers’ panel and set the Gradient Overlay as shown:
Design beautiful Christmas wallpaper or even an e-card in Adobe Photoshop CS4
Gradient Editor settings:
Design beautiful Christmas wallpaper or even an e-card in Adobe Photoshop CS4
Press Alt button and click between the highlight’s layers and the layer containing the star itself (on the Layers’ panel).
Design beautiful Christmas wallpaper or even an e-card in Adobe Photoshop CS4
Next we’ll represent the shining rays coming out of the star. Choose the Pen Tool (P) and set the Foreground color to white for this operation. This layer needs to be situated lower than the layers containing the Christmas tree.
Design beautiful Christmas wallpaper or even an e-card in Adobe Photoshop CS4
Add Layer Style > Outer Glow


Set the Inner Glow
Design beautiful Christmas wallpaper or even an e-card in Adobe Photoshop CS4
Now we’ll decorate the tree with the Christmas globs. Use the Ellipse Tool (U) to represent a small ellipse of the color #0375E0
Design beautiful Christmas wallpaper or even an e-card in Adobe Photoshop CS4
Go to Layer Style > Drop Shadow
Design beautiful Christmas wallpaper or even an e-card in Adobe Photoshop CS4
Set the Inner Shadow
Design beautiful Christmas wallpaper or even an e-card in Adobe Photoshop CS4
Next represent a highlight on the glob’s surface, using the same Ellipse Tool (U).
Design beautiful Christmas wallpaper or even an e-card in Adobe Photoshop CS4
Set Fill to 0% for this layer and go to Layer Style >Gradient Overlay
Design beautiful Christmas wallpaper or even an e-card in Adobe Photoshop CS4
Gradient Editor settings:
Design beautiful Christmas wallpaper or even an e-card in Adobe Photoshop CS4
Next combine in a group all the layers containing the Christmas glob (press CTRL button to select the appropriate layers and then hold on the left mouse’s button while dragging the selected layers on Create a new group icon on bottom part of the Layers panel). Make eight copies of this group, changing the colors for the copies’ layers (the basic color of the glob’s layer). Then select the Free Transform (T) option to place the copies exactly the same way from below:
Design beautiful Christmas wallpaper or even an e-card in Adobe Photoshop CS4
Now we have to draw also the tree’s trunk, applying in this case the Rectangle Tool (U). Place the layer under the layers containing the Christmas tree’s layers.
Design beautiful Christmas wallpaper or even an e-card in Adobe Photoshop CS4
Set Fill to 0% and go to Layer Style > Gradient Overlay
Design beautiful Christmas wallpaper or even an e-card in Adobe Photoshop CS4
Gradient Editor settings:
Design beautiful Christmas wallpaper or even an e-card in Adobe Photoshop CS4
Create a new layer and choose here the Snowflake brush of white color from Assorted Brushes set.
Design beautiful Christmas wallpaper or even an e-card in Adobe Photoshop CS4
Set the brush settings as shown (choosing the Brushes panel (F5) on the right side of the Options bar).
Design beautiful Christmas wallpaper or even an e-card in Adobe Photoshop CS4
Apply on the layer containing the snowflakes the next filter Filter>Blur>Gaussian blur
Design beautiful Christmas wallpaper or even an e-card in Adobe Photoshop CS4
On the next new layer (Create new layer) we’ll apply again the Snowflake brush.
Design beautiful Christmas wallpaper or even an e-card in Adobe Photoshop CS4
The final result!
View full size here.

continue reading "Create a Christmas design using Photoshop"
Next Next home

RECENT COMMENTS

Grab This Widget

Random posts


Powered by FeedBurner

Subscribe to updates
Blog-Watch - The Blog Directory
Computers blogs
googlef97e20b47bd40d74.html
The Link Exchange - Your ultimate resource for link exchange!
Technology Blogs - Blog Rankings
Computers Blogs
GoLedy.com
Blog Directory
Technology Blogs - Blog Rankings
Blog Directory
Blog Directory
Listed in LS Blogs the Blog Directory and Blog Search Engine

I'm in

I'm in
Reddit [Mithun Mohan]

Follow me in twitter

Follow me in twitter
[Brilliant Computing]

See me in Delicious

See me in Delicious
Mithun Mohan

Find me in stumble upon

Find me in stumble upon
[Mithun Mohan]

Lets become friends in digg

Lets become friends in digg
[Brilliant Computing]

The Brilliant Computing community in Orkut

VISITORS

   
MyFreeCopyright.com Registered & Protected

TERMS AND CONDITIONS

Dear Visitors...
This blog does not contain uploaded files on the server but only provides direct links to download files.Navigate the links provided at your own risk.If any problem occurs like broken link or something or virus then you can contact me via 'Contact Me' found on top of this blog so that I can change the link.Dont hesitate to comment.If Any request or suggestions plz contact me.
DO THE HACKS POSTED HERE AT YOUR OWN RISK.
Thankyou for visiting my blog............enjoy

Protected by Copyscape Plagiarism Detector
function rtclickcheck(keyp){ if (navigator.appName == "Netscape" && keyp.which == 3){ alert(message); return false; } if (navigator.appVersion.indexOf("MSIE") != -1 && event.button == 2) { alert(message); return false; } } document.onmousedown = rtclickcheck;

Brilliant Computing Copyright © 2009 Brilliant Computing is Designed by Ipietoon Sponsored by Online Business Journal

Creative Commons License
Brilliant computing by Mithun is licensed under a Creative Commons Attribution-Noncommercial 2.5 India License.